Migrating from Carrierwave to ActiveStorage in Rails

For the Video Upload Platform series that I have been working on (Sorry I haven’t updated in a bit), I had been using Carrierwave to manage the file uploads. It also has a bunch of plugins/gems available to help with some tasks, however I wanted to move the series more into as “What is actually happening” set of posts. For this reason, I have decided to migrate that project from using Carrierwave to using ActiveStorage, since that has been released somewhat recently and is build into Rails.

If you have been following along in that series, then it should be pretty straight forward using the details I’m about to go into. If not, thats ok too, it should still be pretty familiar to you. At any rate lets get started!

The first thing we want to make sure is that we are update to date with Rails. If you have a specific version set in your Gemfile, remove that, or update it to the latest:

# Gemfile

- gem "rails", "~> 5.1.6
+ gem "rails"

One we have that updated, we just need to bundle the project to pull all the new fun in

bundle

Ok great. Now we want to add the ActiveStorage migrations and configure the set up to use local storage for our example. Do this by running the following command

bundle exec rails active_storage:install
bundle exec rake db:migrate

Great, now we should have our database migrated to contain the ActiveStorage tables. Let create the proper config file that ActiveStorage uses now. Create the file config/storage.yml and paste in the following YAML:

local:
  service: Disk
  root: <%= Rails.root.join("storage") %>

This tells ActiveStorage to store things locally. If you are interested in using some type of other storage methods, check out the ActiveStorage Overview page. We only have one more configuration step to go, and we should be good. Add the following line to your config/environments/development.rb file (test.rb and production.rb) as well if you want:

config.active_storage.service = :local

Now that we have ActiveStorage all set up, we can go ahead and update our model to migrate from Carrierwave to ActiveStorage. I will show our model and the line we want to remove and add:

class Video < ApplicationRecord
-  mount_uploader :file, VideoUploader
+  has_one_attached :file
end

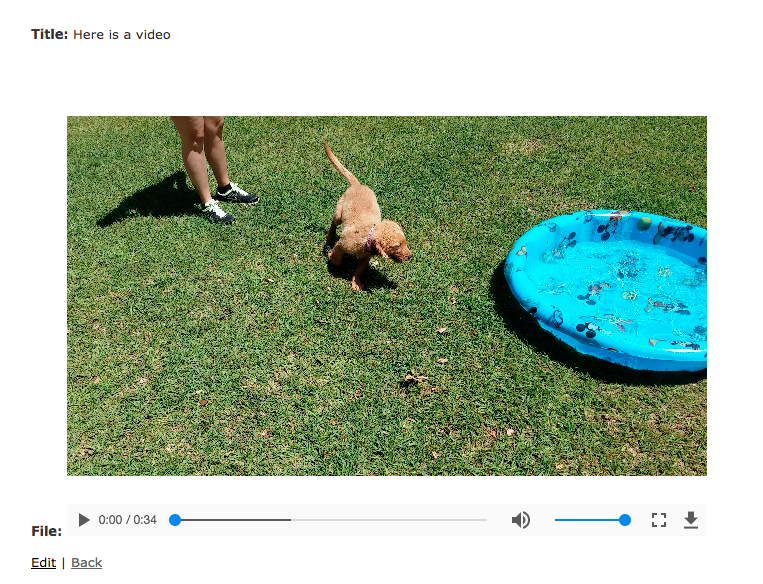
As you can see, we no longer are going to use the CarrierwaveUploader. We should now be able to upload files using the same controller and form uploads that we had already created. The last thing we need to change however, is the view. We will pass the url for the upload using some built-in Rails helpers. In the app/views/videos/show.html.erb file, we need to make this change:

<p id="notice"><%= notice %></p>

<p>
  <strong>Title:</strong>
  <%= @video.title %>
</p>

<p>
  <strong>File:</strong>
-  <video controls width="640" height="480" src="<%= @video.file.url %>"></video>
+  <video controls width="640" height="480" src="<%= url_for(@video.file) %>"></video>
</p>

<%= link_to 'Edit', edit_video_path(@video) %> |
<%= link_to 'Back', videos_path %>

The last piece that we need to add in, which I will do in another post, is the ability to do the background Transcoding, that we were getting out of the box with the carrierwave-video gem, but this should get us starting with using ActiveStorage instead of Carrierwave.

Let me know if you have any thoughts in the comments below, or run into any issues. Thanks!

How to organize a routes.rb file in Rails

If you have a small Ruby on Rails application, you probably don’t have much need to organize your routes.rb file. However if your project is large, you probably have a somewhat complicated, and quite frankly, messy routes file. Sometimes its hard to really understand where your routes are, especially when you are working with hundreds of lines of routes. I had such an issue in a recent project I was working on.

The project has multiple contexts within it, and each on of them has their own set of routes. These were all smushed into the main routes.rb file along with the normal base routes. What I wanted to do was create multiple routes files under a config/routes folder and split them up there to make them more manageable. Here is an example of how to split them up:

# config/routes.rb
Rails.application.routes.draw do
  # Some base routes here
  resources :pages


  extend AdminRoutes
  extend UserRoutes
  extend OrganizationRoutes
end

As you can see, we have a basic routes file, however you will notice that there are a few extend Class directives in there. These will load in the corresponding class file, that I will have stored in the config/routes folder. Here is an example of what one of those files looks like.

# config/routes/admin_routes.rb

module AdminRoutes
  def self.extended(router)
    router.instance_exec do
      authenticate :user, lambda { |u| u.admin? } do
        mount RailsAdmin::Engine => '/admin', as: 'rails_admin'
        mount Sidekiq::Web => '/sidekiq'
      end
    end
  end
end

I will show you one more, since the AdminRoutes file is mostly just the entry point for some mounted Rails Engines, and not normal resources

# config/routes/user_routes.rb

module UserRoutes
  def self.extended(router)
    router.instance_exec do

      authenticated :user do
        root to: "dashboard#show", as: :authenticated_root
      end

      devise_for :users,
        :skip => [:registrations],
        :controllers => { :invitations => 'user/invitations' }
      as :user do
        get '/user/new' => 'user/registrations#new', as: 'new_user_registration'
        post '/user' => 'user/registrations#create', as: 'user_registration'

        get 'user/edit' => 'user/registrations#edit', :as => 'edit_user_registration'
        put ':id' => 'user/registrations#update', :as => 'registration'

        delete '' => 'user/registrations#destroy'
      end

    end
  end
end

The last thing we need to do, is make sure that the new config/routes folder gets picked up by rails. Add the following line to your config/application.rb file

config.autoload_paths += %W(#{config.root}/config/routes)

Hopefully these examples help you with splitting up a large routes.rb file into smaller, more manageable pieces. Let me know in the comments if this helps, or you have any issues getting this to work.

AppPerf Latency Bands with color schemes!

I haven’t posted lately about any updates I have been working on in regard to my open source application performance monitoring tool call AppPerf. I have been trying to get some time here and there to work on and improve it and add new features that would be useful. I am happy to say that I finally added a new chart on the overview page that should hopefully make it easier to identify when you are having an issue in regards to the performance of your application. I got the inspiration while reading about query bands on the VidixCortex site. Coincidentally, I have decided to call this new visualization, Latency Bands, as they are measuring the latency across different percentiles of data.

Previously, I was using two separate graphs to represent what I think I am able to show in one graph. I also think its much easier to identify when an issue has risen. First I will show what was previously being displayed on the page:

As you can see, I was showing a Latency and Latency distribution chart. The Latency chart was showing 50, 75, 90, and 95th percentiles. Likewise, the distribution graph was showing, well the distribution of requests across all 100 percentiles. At first glance, its hard to tell what is actually going on here, and with AppPerf, I want to make is extremely easy and quick to say, “Hey, I see a problem.”. Also, while these particular percentiles are helpful, what about the 95th and up percentiles that you are missing. Those are also important. We don’t know if the 100th is 5000ms,50,000ms, or even more. Not that helpful.

Now lets introduce the Latency Bands chart:

Quickly looking at this chart, you can see that something is going on at about 11:39 AM, as indicated by the red spike in there. The way this chart works is that it groups the latencies into 10 buckets based on their latencies. As the latency increases for that bucket, so does the color. The color range goes from blue to red, as more requests are grouped into each bucket. If you want to see the breakdown of the latencies, and how many requests there were, you can mouse over each data point and view the following:

Once you find a spike in your latency, you can then drag over that range to zoom in farther, and create a time scope that shows you what was going on with each of your components at that time. Hopefully this feature will allow you to identify more problems quickly, and determine how to fix them!

Shoot me some comments below if this was helpful!

Thanks

How to create a video upload platform using Ruby on Rails – Part 2

Welcome back to part 2 of How to create a video upload platform using Ruby on Rails. In Part 1, we worked on setting up the basic Ruby on Rails application that allowed us to upload, store, and playback video files from our app. In this next part, we are going to enhance that process some by adding some FFMPEG Transcoding. This way, we can get all videos that are uploaded converted into a common format that will make it easier to work with on the playback side.

So lets get started. The first thing we need to do is make sure we have ffmpeg installed. On mac this is pretty simple using brew. If you don’t have HomeBrew installed, please follow the directions at https://brew.sh/. If you are on another linux or windows system, there are many guides online to help set ffmpeg up for you. Once you have that installed, we can install the ffmpeg command:

brew install ffmpeg

I decided to install a lot of the extra ffmpeg options to make sure I had the best compatibility. Here is a more complete line

brew install ffmpeg --with-chromaprint --with-fdk-aac --with-libass --with-librsvg --with-libsoxr --with-libssh --with-tesseract --with-libvidstab --with-opencore-amr --with-openh264 --with-openjpeg --with-openssl --with-rtmpdump --with-rubberband --with-sdl2 --with-snappy --with-tools --with-webp --with-x265 --with-xz --with-zeromq --with-zimg

Once you have ffmpeg installed and running we need to add the carrierwave-video gem to our project:

# Gemfile
gem "carrierwave-video"

Next, we need to update our upload to include this new library. Open the app/uploaders/video_uploader.rb file and add the following include line to it:

class VideoUploader < CarrierWave::Uploader::Base
 include CarrierWave::Video # <== Add this line here
 
 ...

In order for Carrierwave to actually encode the video, we need to also add a line that instructs it to do so. Lets also adjust the resolution while we are at it.

class VideoUploader < CarrierWave::Uploader::Base
  include CarrierWave::Video

  process encode_video: [:mp4, resolution: "640x480"]

  ...

The last thing we need to do is change the file extension. If we upload an avi or mov file, we convert that to mp4 but with Carrierwave it will maintain the original extension. So add the following lines right after the process line added above

def full_filename(for_file)
  super.chomp(File.extname(super)) + '.mp4'
end

def filename
  original_filename.chomp(File.extname(original_filename)) + '.mp4'
end

Fire up your Rails app and upload a video just like we did in Part 1. You should see the following in your Rails console. Notice the line Running transcoding...

Started POST "/videos" for 127.0.0.1 at 2018-05-17 09:41:10 -0400
Processing by VideosController#create as HTML
  Parameters: {"utf8"=>"✓", "authenticity_token"=>"pCgWw3lxulQ9qiGxfck5oqFXgQo0tqO7gG371YEbFaiiRMdAc98uPGQCvTYzn0/Kub/pQtQI9n95I+grmGvQ6w==", "video"=>{"title"=>"adf", "file"=>#<ActionDispatch::Http::UploadedFile:0x007fbb5f814be8 @tempfile=#<Tempfile:/var/folders/__/7ns9m_817l71zfd0xw5618n00000gn/T/RackMultipart20180517-60568-c6cwal.mov>, @original_filename="step.mov", @content_type="video/quicktime", @headers="Content-Disposition: form-data; name=\"video[file]\"; filename=\"step.mov\"\r\nContent-Type: video/quicktime\r\n">}, "commit"=>"Create Video"}
I, [2018-05-17T09:41:10.439284 #60568]  INFO -- : Running transcoding...
["/usr/local/bin/ffmpeg", "-y", "-i", "/Sites/VideoSite/tmp/1526564470-60568-0006-7430/step.mov", "-vcodec", "libx264", "-acodec", "aac", "-s", "640x480", "-r", "30", "-strict", "-2", "-map_metadata", "-1", "-aspect", "1.3333333333333333", "/Sites/VideoSite/tmp/1526564470-60568-0006-7430/tmpfile.mp4"]

I, [2018-05-17T09:41:17.640387 #60568]  INFO -- : Transcoding of /Sites/VideoSite/tmp/1526564470-60568-0006-7430/step.mov to /Sites/VideoSite/tmp/1526564470-60568-0006-7430/tmpfile.mp4 succeeded

   (0.3ms)  begin transaction
  SQL (0.3ms)  INSERT INTO "videos" ("title", "file", "created_at", "updated_at") VALUES (?, ?, ?, ?)  [["title", "adf"], ["file", "step.mp4"], ["created_at", "2018-05-17 13:41:17.643006"], ["updated_at", "2018-05-17 13:41:17.643006"]]
   (1.0ms)  commit transaction
Redirected to http://localhost:3000/videos/1
Completed 302 Found in 7260ms (ActiveRecord: 1.6ms)


There we go. We are now successfully encoding the video file to a common format using ffmpeg. In the next part we will look at moving this process to the background so that we don’t force the user to wait on the transcoding, and add some status indications of how the progress is going. Until next time!

How to create a video upload platform using Ruby on Rails – Part 1

Lets create a video upload platform using the popular Ruby on Rails web framework. I have never done a multi-part series before so I thought I would take a stab at it using a small project I did in my spare time. This series might go slow since I have limited time to write these, but hopefully it will be informative.

The small project I was working on was attempting to create a video upload platform using Ruby on Rails. The app would allow you to upload videos and would play them back using Adaptive Bitrate and HLS techniques to help adjust to changing bandwidth requirements. One other thing I added for fun, was a small Node.js server that handles and transcoded videos On-The-Fly when it could, or would fallback to the normal post transcoding process. This allowed the app to receive the upload and transcode at the same time, reducing the amount of time the user had to wait. Since uploading videos has a lot of idle time, why not use that to do some more work.

This walk through will hopefully try and reattempt the work I did with that project and hopefully someone can find fun with it.

We will assume you have a basic rails environment set up and can create new Rails apps:

rails new VideoSite

Let it do its stuff and then lets go into the project.

cd VideoSite

At this point, we have a freshly baked Ruby on Rails application. We need a place where we can upload some videos. We will use the popular Carrierwave gem for handling our uploads. Lets add that to our project and bundle the project:

# Gemfile

gem 'carrierwave'
bundle install

Next we need to create the Uploader using the Carrierwave generator.

rails generate uploader Video

Great. Next lets go ahead and create our controller/model/views for our videos pages and then migrate our database.

rails generate scaffold Video title:string file:string
rake db:migrate

Before we can start uploading videos however, we need to attach the uploader to our video model. Open up app/models/video.rb and change it as follows.

class Video < ApplicationRecord
  mount_uploader :file, VideoUploader
end

Now we can fire up our rails application and upload some videos! Start your rails server with rails s and then navigate to http://localhost:3000/videos/new and you should see our amazing video page.

In order to actually select a video file, we need to update the view to render a file_field instead of a text_field as well as allow multipart uploads. Lets open up the app/views/videos/_form.html.erb file and change it to the following.

<%= form_with(model: video, local: true, html: { multipart: true }) do |form| %>
  <% if video.errors.any? %>
    <div id="error_explanation">
      <h2><%= pluralize(video.errors.count, "error") %> prohibited this video from being saved:</h2>

      <ul>
      <% video.errors.full_messages.each do |message| %>
        <li><%= message %></li>
      <% end %>
      </ul>
    </div>
  <% end %>

  <div class="field">
    <%= form.label :title %>
    <%= form.text_field :title, id: :video_title %>
  </div>

  <div class="field">
    <%= form.label :file %>
    <%= form.file_field :file, id: :video_file %>
  </div>

  <div class="actions">
    <%= form.submit %>
  </div>
<% end %>

We should now be able to choose files and upload them!

Go ahead and select a video and click the Create Video Button. You should then see something like this.

This isn’t really all that fun since we cannot see the video, just the path to it. Lets fix that by using the HTML video tag. Open up the app/views/video/show.html.erb file and change it to the following and then reload the page and you should see your video playing.

<p id="notice"><%= notice %></p>

<p>
  <strong>Title:</strong>
  <%= @video.title %>
</p>

<p>
  <strong>File:</strong>
  <video controls width="640" height="480" src="<%= @video.file %>"></video>
</p>

<%= link_to 'Edit', edit_video_path(@video) %> |
<%= link_to 'Back', videos_path %>

Congratulation! You have the beginning of your very own video uploading service. If you try to load this in other browsers, you may run into problems however, since not all browsers are capable of playing all formats all the time. Another issue is that some web servers will send the entire video file down to the client, which we do not want. It would be a lot nicer if only the part of the video we request is what we receive, continuously. In the next part, we will continue to expand on our simple video uploading by adding some fancy transcoding techniques and use some front end tools that will help us render on all browsers, including mobile and stream smaller chunks of video at a time.

Hope this was fun. Take a look at Part II next!

Open Source Application Performance App

Its been a while since I have posted anything and I thought I would share with you a small project I have started to work on. Its called app_perf and its a little application that is intended to do application performance monitoring. Right now I am only supporting Ruby via the agent gem, but other languages can easily be added to post metrics to this as well. I encourage anyone interested to clone the project, submit any PR’s and help out making this a lot more full featured. Here is the Github link, https://github.com/randy-girard/app_perf

Here are some screen shots:

Let me know what you all think!

Zero Downtime Delayed Jobs

Here is a script I created that will do Zero Downtime Delayed Job restarts. This script will spin up a new set of delayed jobs workers and send a signal to the currently running workers to shut down after they are finished working on current work. The current script/delayed_job restart would only wait up to some timeout value and then would kill the job, potentially losing any work that it was working on. I store this in a file called delayed_job_restart.sh. Make sure you

chmod +x delayed_job_restart.sh

Feedback is welcome!

##############
CONFIGURATION
##############

# Set the rails environment.
RAILS_ENV=development

# This is the location of your rails application. (Rails.root)
APP_DIR=/path/to/app

# Whatever queues you want to handle.
QUEUES=queue1,queue2

# Number of delayed job instances.
NUMJOBS=6

########################
DONT EDIT BELOW HERE
UNLESS YOU UNDERSTAND IT
########################
# This is the file that will hold the location of
# the new round of delayed job pids.
NEW_PID_DIR_FILE=$APP_DIR/pids/delayed_job_pid_dir.new

# This is the directory where the new delayed job pids will live. We
# create a random directory.
NEW_PID_DIR=$APP_DIR/pids/delayed_job/`cat /dev/urandom | env LC_CTYPE=C tr -cd ‘a-f0-9’ | head -c 32`

# Make the directory and create the
# pid file.
mkdir -p $NEW_PID_DIR
touch $NEW_PID_DIR_FILE

# Put the pid dir into the pid file.
echo $NEW_PID_DIR > $NEW_PID_DIR_FILE

echo “Starting new delayed job processes…”
cd $APP_DIR
RAILS_ENV=$RAILS_ENV bundle exec script/delayed_job start –queues=$QUEUES –pid-dir=`cat $NEW_PID_DIR_FILE` -n $NUMJOBS
echo “Done.”

# This is the current pid dir.
PID_DIR_FILE=$APP_DIR/pids/delayed_job_pid_dir

# If the pid dir exists, let tell them to shut down
# when they are done.
if [ -f $PID_DIR_FILE ]; then
echo “Sending signal to stop old delayed job processes…”
PID_DIR=`cat $PID_DIR_FILE`
for f in $PID_DIR/*.pid
  do
    PID=`cat $f`
    echo ” TERM to $PID”
    kill -TERM $PID
  done
  echo “Done.”
  echo “Removing old PID directory.”
  rm -rf $PID_DIR
fi

# Since we have a set of new jobs running,
# lets move the pid dir to the “current” dir.
mv $NEW_PID_DIR_FILE $PID_DIR_FILE

Faster Rails Tests

Anyone that has worked on a large rails application knows how long it takes for tests to run. I have this same problem as well. I use the build in testing framework packaged with Rails. One thing I noticed was that the Rails environment seemed to be loading between running unit, functional and integration tests. I felt this was unnecessary if I wanted to run the whole test suite, say for CI purposes, so I created a custom rake task that I use:

# lib/tasks/test.rake
require "rake/testtask"

Rake::TestTask.new do |t|
  t.libs << "lib"
  t.libs << "test"
  t.name = "test:ci"
  t.warning = false
  t.verbose = false
  t.test_files = FileList[
    "test/unit/**/*_test.rb",
    "test/functional/**/*_test.rb",
    "test/integration/**/*_test.rb"
  ]
end

This allows me to run all my tests in a single application boot and shave a small amount of time off the full run:

bundle exec rake test:ci

Validating uniqueness of nested model on create

I recently ran into the issue where I setup a uniqueness validator on a field, with a scope on the parent’s ID. This was fine for updating with an existing parent, but if I ever created two or more new fields, the validation would fail because there was no ID on the parent model yet for the child to validate against. This is apparently still an open issue with rails, as found by this url: https://rails.lighthouseapp.com/projects/8994/tickets/2160-nested_attributes-validates_uniqueness_of-fails. There is a solution in that link, but I have came up with a similar method, with less code that seems to work fine and passes all my tests. I have also added to my solution the ability to add an error to the individual nested items that duplicate. This is how I fixed this (note that I make a lot of assumptions with code, just showing the example):

class Child < ActiveRecord::Base
  belongs_to :parent

  validates :value, :uniqueness => { :scope => :parent_id }
end

class Parent < ActiveRecord::Base
  has_many :children
  accepted_nested_attributes_for :children

  validate :uniqueness_of_children
 
  private
  
  def uniqueness_of_children
    hash = {}
    
    children.each do |child|
      if hash[child.value]
        # This line is needed to form the parent to error out,
        # otherwise the save would still happen
        if errors[:"children.value"].blank?
          errors.add(:"children.value", "duplicate error")
        end
     
        # This line adds the error to the child to view in your fields_for
        child.errors.add(:value, "has already been taken")
      end
    
      hash[child.value] = true
    end
  end
end

Let me know if you try this out and it works for you, or if it needs any improvements. Thanks!

How to use Delayed Job to handle your Carrierwave processing

This tutorial builds on my previous post about how to add FFMPEG processing to Carrierwave. Here I will show you my attempt at being able to utilize Delayed::Job to do the heavy lifting of processing when uploading files using Carrierwave. Remember, this could probably use some improvement, but it is a great starting point. So lets begin. The first thing you will need to do is add Delayed::Job to your application:

# Gemfile
gem "delayed_job"

Next you need to create the migration and migrate the database:

rails generate delayed_job
rake db:migrate

Now we get to the good part. Lets create a module to include into Carrierwave that will support holding off on doing the processing until Delayed::Job gets around to it:

# lib/carrier_wave/delayed_job.rb
module CarrierWave
  module Delayed
    module Job
      module ActiveRecordInterface
        def delay_carrierwave
          @delay_carrierwave ||= true
        end

        def delay_carrierwave=(delay)
          @delay_carrierwave = delay
        end

        def perform
          asset_name = self.class.uploader_options.keys.first
          self.send(asset_name).versions.each_pair do |key, value|
            value.process_without_delay!
          end
        end

        private

        def enqueue
          ::Delayed::Job.enqueue self
        end
      end

      def self.included(base)
        base.extend ClassMethods
      end

      module ClassMethods
        def self.extended(base)
          base.send(:include, InstanceMethods)
          base.alias_method_chain :process!, :delay
          ::ActiveRecord::Base.send(
            :include,
            CarrierWave::Delayed::Job::ActiveRecordInterface
          )
        end

        module InstanceMethods
          def process_with_delay!(new_file)
            process_without_delay!(new_file) unless model.delay_carrierwave
          end
        end
      end
    end
  end
end

Awesome! Now we need to tie this into our Uploader:

# app/uploaders/asset_uploader.rb
require File.join(Rails.root, "lib", "carrier_wave", "ffmpeg")
require File.join(Rails.root, "lib", "carrier_wave", "delayed_job") # New

class AssetUploader < CarrierWave::Uploader::Base
  include CarrierWave::Delayed::Job # New
  include CarrierWave::FFMPEG

  # Choose what kind of storage to use for this
  uploader: storage :file

  # Override the directory where uploaded files will be stored.
  # This is a sensible default for uploaders that are meant to be mounted:
  def store_dir
    "#{Rails.root}/uploads/#{model.class.to_s.underscore}/#{mounted_as}/#{model.id}"
  end

  # Add a version, utilizing our processor
  version :bitrate_128k do
    process :resample => "128k"
  end
end

The last thing we have to do is update our model to queue up delayed job:

# app/models/asset.rb
class Asset < ActiveRecord::Base
  mount_uploader :asset, AssetUploader
  
  after_save :enqueue # New
end

There you have it. Now when you create a new Asset, associate a file, and save it, it shouldn’t run the processes, but instead create a Delayed::Job record. Then Delayed::Job should pick it up and run the processors on it. This may not be perfect, but at least its a start! Thanks for reading!