Open Source Application Performance App

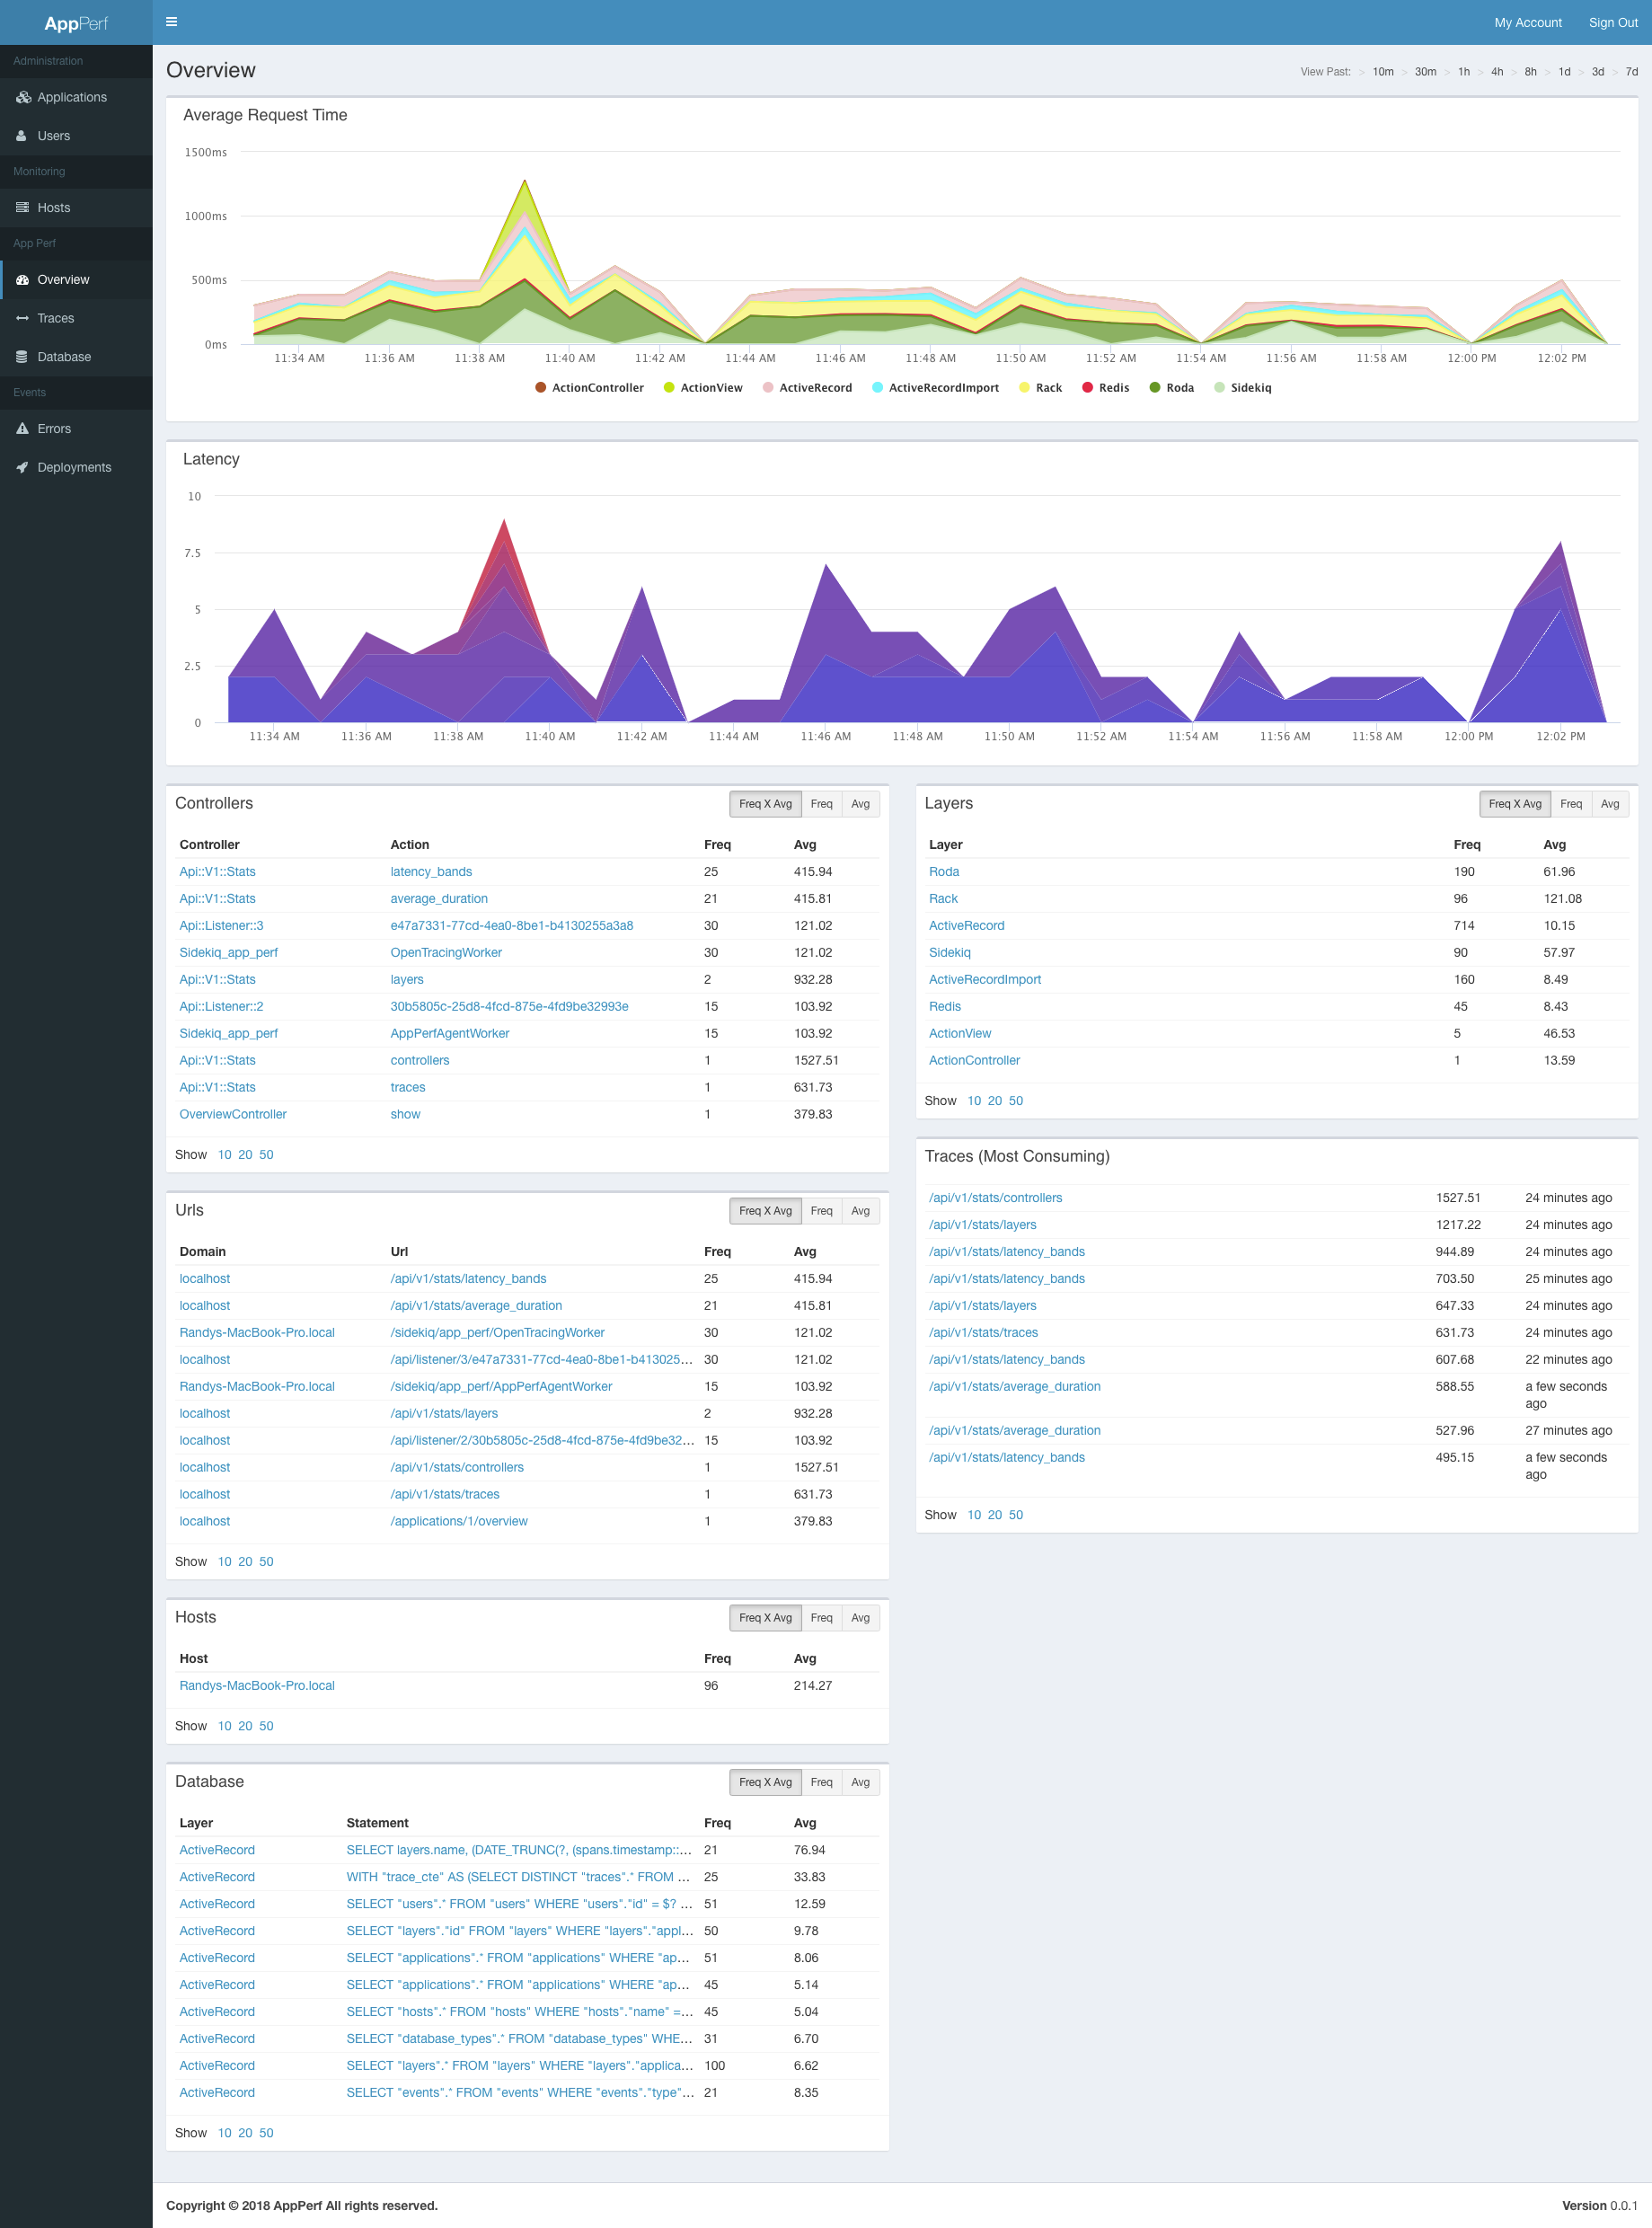
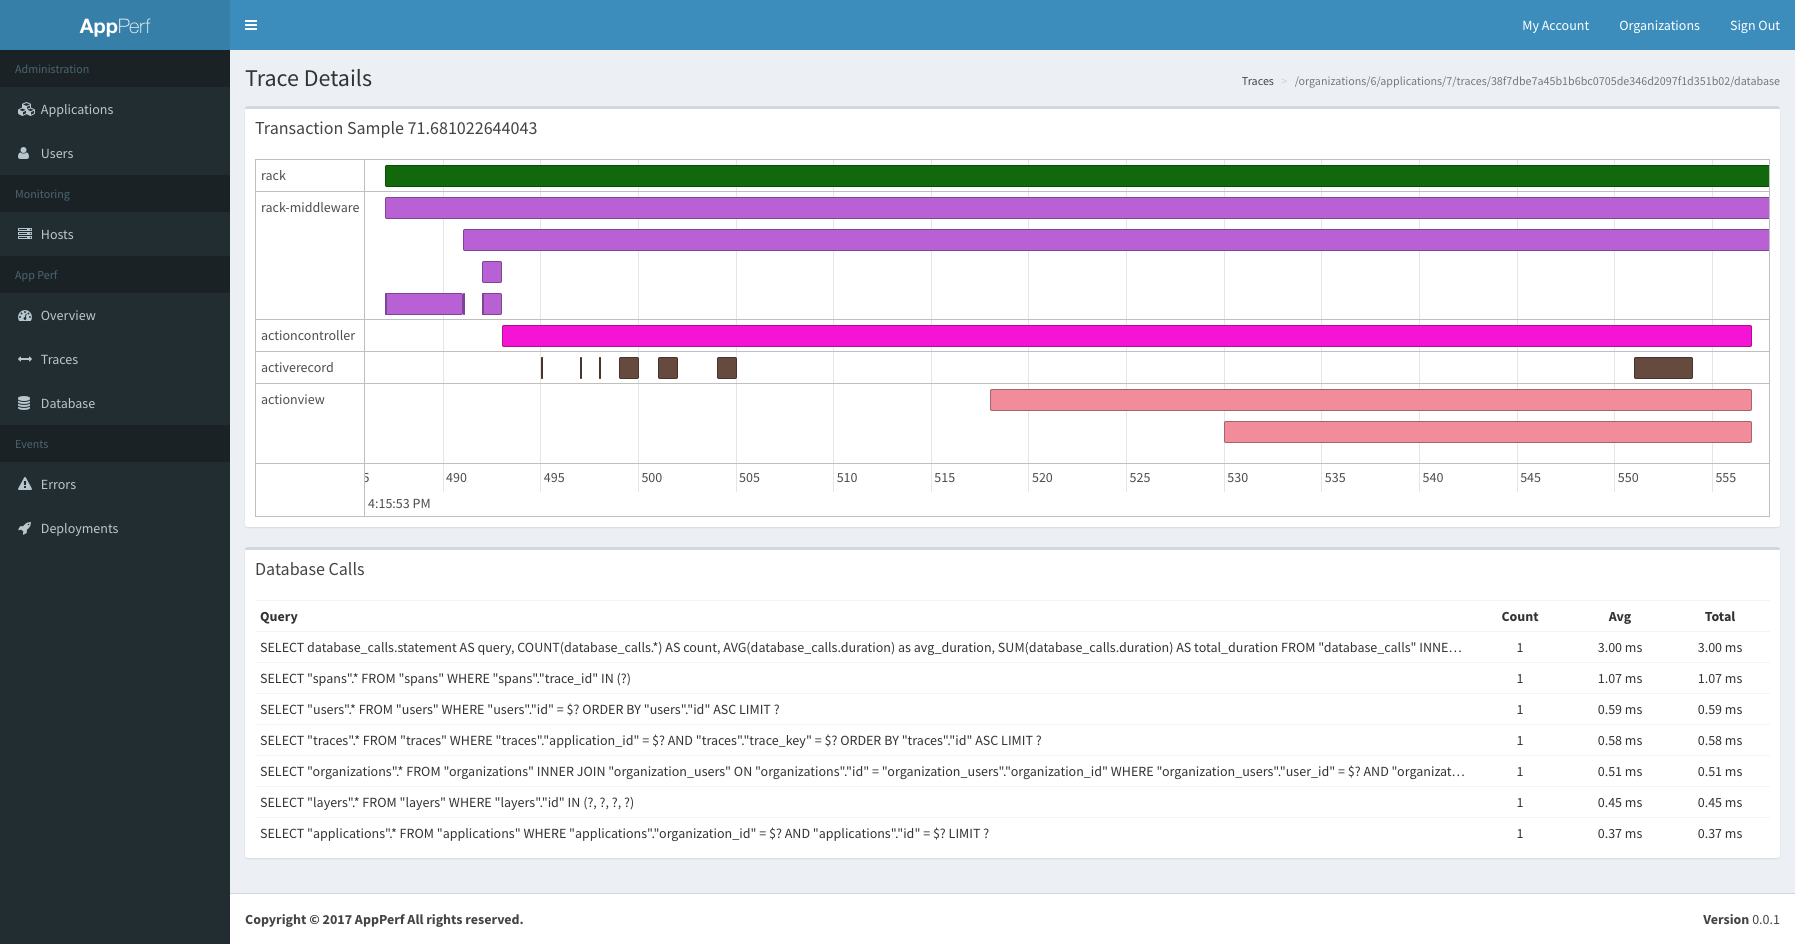
Its been a while since I have posted anything and I thought I would share with you a small project I have started to work on. Its called app_perf and its a little application that is intended to do application performance monitoring. Right now I am only supporting Ruby via the agent gem, but other languages can easily be added to post metrics to this as well. I encourage anyone interested to clone the project, submit any PR’s and help out making this a lot more full featured. Here is the Github link, https://github.com/randy-girard/app_perf

Here are some screen shots:

Let me know what you all think!

Zero Downtime Delayed Jobs

Here is a script I created that will do Zero Downtime Delayed Job restarts. This script will spin up a new set of delayed jobs workers and send a signal to the currently running workers to shut down after they are finished working on current work. The current script/delayed_job restart would only wait up to some timeout value and then would kill the job, potentially losing any work that it was working on. I store this in a file called delayed_job_restart.sh. Make sure you

chmod +x delayed_job_restart.sh

Feedback is welcome!

##############
CONFIGURATION
##############

# Set the rails environment.
RAILS_ENV=development

# This is the location of your rails application. (Rails.root)
APP_DIR=/path/to/app

# Whatever queues you want to handle.
QUEUES=queue1,queue2

# Number of delayed job instances.
NUMJOBS=6

########################
DONT EDIT BELOW HERE
UNLESS YOU UNDERSTAND IT
########################
# This is the file that will hold the location of
# the new round of delayed job pids.
NEW_PID_DIR_FILE=$APP_DIR/pids/delayed_job_pid_dir.new

# This is the directory where the new delayed job pids will live. We
# create a random directory.
NEW_PID_DIR=$APP_DIR/pids/delayed_job/`cat /dev/urandom | env LC_CTYPE=C tr -cd ‘a-f0-9’ | head -c 32`

# Make the directory and create the
# pid file.
mkdir -p $NEW_PID_DIR
touch $NEW_PID_DIR_FILE

# Put the pid dir into the pid file.
echo $NEW_PID_DIR > $NEW_PID_DIR_FILE

echo “Starting new delayed job processes…”
cd $APP_DIR
RAILS_ENV=$RAILS_ENV bundle exec script/delayed_job start –queues=$QUEUES –pid-dir=`cat $NEW_PID_DIR_FILE` -n $NUMJOBS
echo “Done.”

# This is the current pid dir.
PID_DIR_FILE=$APP_DIR/pids/delayed_job_pid_dir

# If the pid dir exists, let tell them to shut down
# when they are done.
if [ -f $PID_DIR_FILE ]; then
echo “Sending signal to stop old delayed job processes…”
PID_DIR=`cat $PID_DIR_FILE`
for f in $PID_DIR/*.pid
  do
    PID=`cat $f`
    echo ” TERM to $PID”
    kill -TERM $PID
  done
  echo “Done.”
  echo “Removing old PID directory.”
  rm -rf $PID_DIR
fi

# Since we have a set of new jobs running,
# lets move the pid dir to the “current” dir.
mv $NEW_PID_DIR_FILE $PID_DIR_FILE

Faster Rails Tests

Anyone that has worked on a large rails application knows how long it takes for tests to run. I have this same problem as well. I use the build in testing framework packaged with Rails. One thing I noticed was that the Rails environment seemed to be loading between running unit, functional and integration tests. I felt this was unnecessary if I wanted to run the whole test suite, say for CI purposes, so I created a custom rake task that I use:

# lib/tasks/test.rake
require "rake/testtask"

Rake::TestTask.new do |t|
  t.libs << "lib"
  t.libs << "test"
  t.name = "test:ci"
  t.warning = false
  t.verbose = false
  t.test_files = FileList[
    "test/unit/**/*_test.rb",
    "test/functional/**/*_test.rb",
    "test/integration/**/*_test.rb"
  ]
end

This allows me to run all my tests in a single application boot and shave a small amount of time off the full run:

bundle exec rake test:ci

Validating uniqueness of nested model on create

I recently ran into the issue where I setup a uniqueness validator on a field, with a scope on the parent’s ID. This was fine for updating with an existing parent, but if I ever created two or more new fields, the validation would fail because there was no ID on the parent model yet for the child to validate against. This is apparently still an open issue with rails, as found by this url: https://rails.lighthouseapp.com/projects/8994/tickets/2160-nested_attributes-validates_uniqueness_of-fails. There is a solution in that link, but I have came up with a similar method, with less code that seems to work fine and passes all my tests. I have also added to my solution the ability to add an error to the individual nested items that duplicate. This is how I fixed this (note that I make a lot of assumptions with code, just showing the example):

class Child < ActiveRecord::Base
  belongs_to :parent

  validates :value, :uniqueness => { :scope => :parent_id }
end

class Parent < ActiveRecord::Base
  has_many :children
  accepted_nested_attributes_for :children

  validate :uniqueness_of_children
 
  private
  
  def uniqueness_of_children
    hash = {}
    
    children.each do |child|
      if hash[child.value]
        # This line is needed to form the parent to error out,
        # otherwise the save would still happen
        if errors[:"children.value"].blank?
          errors.add(:"children.value", "duplicate error")
        end
     
        # This line adds the error to the child to view in your fields_for
        child.errors.add(:value, "has already been taken")
      end
    
      hash[child.value] = true
    end
  end
end

Let me know if you try this out and it works for you, or if it needs any improvements. Thanks!

How to use Delayed Job to handle your Carrierwave processing

This tutorial builds on my previous post about how to add FFMPEG processing to Carrierwave. Here I will show you my attempt at being able to utilize Delayed::Job to do the heavy lifting of processing when uploading files using Carrierwave. Remember, this could probably use some improvement, but it is a great starting point. So lets begin. The first thing you will need to do is add Delayed::Job to your application:

# Gemfile
gem "delayed_job"

Next you need to create the migration and migrate the database:

rails generate delayed_job
rake db:migrate

Now we get to the good part. Lets create a module to include into Carrierwave that will support holding off on doing the processing until Delayed::Job gets around to it:

# lib/carrier_wave/delayed_job.rb
module CarrierWave
  module Delayed
    module Job
      module ActiveRecordInterface
        def delay_carrierwave
          @delay_carrierwave ||= true
        end

        def delay_carrierwave=(delay)
          @delay_carrierwave = delay
        end

        def perform
          asset_name = self.class.uploader_options.keys.first
          self.send(asset_name).versions.each_pair do |key, value|
            value.process_without_delay!
          end
        end

        private

        def enqueue
          ::Delayed::Job.enqueue self
        end
      end

      def self.included(base)
        base.extend ClassMethods
      end

      module ClassMethods
        def self.extended(base)
          base.send(:include, InstanceMethods)
          base.alias_method_chain :process!, :delay
          ::ActiveRecord::Base.send(
            :include,
            CarrierWave::Delayed::Job::ActiveRecordInterface
          )
        end

        module InstanceMethods
          def process_with_delay!(new_file)
            process_without_delay!(new_file) unless model.delay_carrierwave
          end
        end
      end
    end
  end
end

Awesome! Now we need to tie this into our Uploader:

# app/uploaders/asset_uploader.rb
require File.join(Rails.root, "lib", "carrier_wave", "ffmpeg")
require File.join(Rails.root, "lib", "carrier_wave", "delayed_job") # New

class AssetUploader < CarrierWave::Uploader::Base
  include CarrierWave::Delayed::Job # New
  include CarrierWave::FFMPEG

  # Choose what kind of storage to use for this
  uploader: storage :file

  # Override the directory where uploaded files will be stored.
  # This is a sensible default for uploaders that are meant to be mounted:
  def store_dir
    "#{Rails.root}/uploads/#{model.class.to_s.underscore}/#{mounted_as}/#{model.id}"
  end

  # Add a version, utilizing our processor
  version :bitrate_128k do
    process :resample => "128k"
  end
end

The last thing we have to do is update our model to queue up delayed job:

# app/models/asset.rb
class Asset < ActiveRecord::Base
  mount_uploader :asset, AssetUploader
  
  after_save :enqueue # New
end

There you have it. Now when you create a new Asset, associate a file, and save it, it shouldn’t run the processes, but instead create a Delayed::Job record. Then Delayed::Job should pick it up and run the processors on it. This may not be perfect, but at least its a start! Thanks for reading!
Create FFMPEG processor for Carrierwave in Rails 3

I have had the pleasure of working with the carrierwave gem recently (as opposed to paperclip), and I must say, I am quite the fan. Once major thing I missed however, was the available list of custom user plugins for it, unlike paperclip. I believe this is mostly due to how new and recent carrierwave is. That being said, I put together a simple example of a FFMPEG process that will allow me to resample the bitrate of a file. This should lay the ground work for other features as well. This example is using Rails 3, but should be easily adaptable for 2. Also, make sure you already have FFMPEG installed and running properly. So lets get started: First things first…we need to add the appropriate gems to our Gemfile:

# Gemfile
gem "carrierwave"
gem "streamio-ffmpeg"

Next is the meat and potatoes of this..the actual FFMPEG process for carrierwave. I choose to keep my plugin files in the directory lib/carrierwave. Make sure you have this path included in your application.rb file if you are using rails 3. Here is the code:

# lib/carrierwave/ffmpeg.rb
require "streamio-ffmpeg"
module CarrierWave
  module FFMPEG
    module ClassMethods
      def resample( bitrate )
        process :resample => bitrate
      end
    end
 
    def resample( bitrate )
      directory = File.dirname( current_path )
      tmpfile = File.join( directory, "tmpfile" )
      File.move( current_path, tmpfile )
      file = ::FFMPEG::Movie.new(tmpfile)
      file.transcode( current_path, :audio_bitrate => bitrate)
      File.delete( tmpfile )
    end
  end
end

Good. Now that we have the plugin coded up, we need to include it into our uploader. I already have one mounted to my Asset model. Here is what my AssetUploader now looks like:

# app/uploaders/asset_uploader.rb
require File.join(Rails.root, "lib", "carrier_wave", "ffmpeg")

class AssetUploader < CarrierWave::Uploader::Base
  include CarrierWave::FFMPEG # <= include the plugin
  
  # Choose what kind of storage to use for this uploader:
  storage :file

  # Override the directory where uploaded files will be stored.
  # This is a sensible default for uploaders that are meant to be mounted:
  def store_dir
    "#{Rails.root}/uploads/#{model.class.to_s.underscore}/#{mounted_as}/#{model.id}"
  end
 
  # Add a version, utilizing our processor
  version :bitrate_128k do
    process :resample => "128k"
  end
end

There! Now whenever you add a new file, it should fire off the processor and create a new version. I hope this help anyone still up in the air about how to put together their own plugin/process for carrierwave. Next I will demonstrate how to incorporate Delayed::Job to move these intensive tasks to the background!

Moved to a new host!

I have spend the last week setting up a new VPS host at Linode. This site and my youtube video playlist site, http://www.jamzee.com, are both currently running on the new host. Everything has been great so far and this will give me more control in the future!

If you are interested in joining Linode, check out my referral link.

How to create PDF’s and Images from your website in Rails

I am going to show you how to generate both a pdf and image from a single action in a controller using the awesome, wkhtmltopdf library. This also uses PDFKit and WebSnap gems available on GitHub. This example assumes the following:

  • wkhtmltopdf and wkhtmltoimage are already installed and accessible on in the PATH.
  • You have an html page setup to display the record.
  • You have created a pdf CSS file to help display the pdf, if you so choose.
# config/initializers/mime_types.rb
Mime::Type.register "application/pdf", :pdf
Mime::Type.register "image/png", :png

# app/controllers/items_controller.rb
def show
  @item = Item.find(params[:id])
  
  respond_to do |format|
    format.html { }
    format.pdf {
      html = render(:action => "show.html.erb")
      
      kit = PDFKit.new( html, :zoom => 0.75 )
      kit.stylesheets << File.join(RAILS_ROOT,
                                   "public",
                                   "stylesheets",
                                   "pdf.css")
      
      send_data kit.to_pdf, :filename => "item.pdf",
                            :type => "application/pdf",
                            :disposition => "inline"
    }
    format.png {
      html = render :action => "show.html.erb",
                    :layout => "application.html.erb"

      # I am nil’ing these options out because my version of wkhtmltoimage does
      # not support the scale options and I do not want to crop the image.
      snap = WebSnap.new(html, :format => "png",
                               :"scale-h" => nil,
                               :"scale-w" => nil,
                               :"crop-h" => nil,
                               :"crop-w" => nil,
                               :quality => 100,
                               :"crop-x" => nil,
                               :"crop-y" => nil)

      send_data snap.to_bytes, :filename => "item.png",
                               :type => "image/png",
                               :disposition => "inline"
    }
  end
end

Now you should be able to access three distinct views, each producing a different result

http://example.com/items/1 # => Generates an html page.
http://example.com/items/1.pdf # => Generates a pdf of the html page.
http://example.com/items/1.png # => Generates a png of the html page.

You could easily also add more image types by just created another block for each format, and changing the :format to whatever one you would like.

Request formats, filters, and functional tests…

I recently had to write some tests against a controller that was filtering based on the requesting format. In this case, I wanted to allow xml requests only, and redirect to login on everything else. This was fine when browsing or using curl by doing a simple:

skip_before_filter :login_required,
  :only => [:create],
  :if => Proc.new {|c| c.request.format.xml?}

My problem came when I was trying to create tests to verify that both html and xml requests did in fact produce the correct response. After many hours of messing around, I came up with a simple solution. First I skip the filters for every request, then I have another filter to re-enable them on anything but the xml request:

skip_before_filter :login_required, :only => [:create]
before_filter :only => [:create] do |c|
  c.send(:login_required) unless c.request.format.xml?
end

Voila!!! This allowed me to continue with my rails testing and browser and curl work appropriately. (I use curl to test the xml request).

def test_not_logged_in_normal_post
  post :create, :login => "test@test.com", :password => "test"
  assert_response :redirect
end

def test_not_logged_in_xml_post
  post :create, :format => "xml", :login => "test@test.com", :password => "test"
  assert_response :success
end

Including methods and associations in a JSON Data set with Rails

I was poking around while working with creating an application specifically for web services. We decided to use JSON as the methods of transportation of data, but the problem came when I wanted to include custom methods, or associations in my data set. The solution was fairly simple, using the to_json method. Suppose you have the following classes:

class Client < ActiveRecord::Base
  has_many :employees
end

class Employee < ActiveRecord::Base
  belongs_to :client

  def full_name
    "#{first_name} #{last_name}"
  end
end

We want the controller to return a client with association employees and the full name in the database. Here is how we would go about doing that:

def show
  @client = Client.find(params[:id])

  respond_to do |format|
    format.json { render :json => @client.to_json(:include => { :employee => { :only => :email, :methods => [:full_name]}})}
  end
end

You will end up with the following data set:

{
  client: {
    name: "Some client",
    employee: {
      email: "test@test.com",
      full_name: "John Doe"
    }
  }
}

Forgive me if I messed up the json output…doing it from memory 🙂 There are of course way easier uses for this too, but I just decided to spit out a more complex one.